Tuesday, December 30, 2014

Adventures in Felting

For the Historical Sew Fortnightly Challenge on menswear, I planned to knit a Machault tuque, the type worn by the French voyageurs as they paddled along the rivers of Canada. My son James is an enthusiastic maker of unusual coats, and some years ago, made a wool voyageur capote, a long, hooded coat. His supportive wife crocheted a long, colorful sash to go with it, and he cut quite a figure on the snowy streets of Winnipeg. Passersby complimented him, one saying that more Canadian men ought to dress like that. 
Of course, he was missing the crowning piece, the red wool Machaut cap. I found an excellent pattern from Wicked Woolens. Sally Pointer sells this authentic pattern with interesting background information. The cap is knitted in the round like a huge football and felted. It turns in on itself so it is very thick and warm. 


I used Lamb's Pride worsted weight yard in a bright red (Red Baron) and size 8 needles. It knitted up beautifully , and my finished product was huge! Then came the felting. First round, it thickened up but was about two inches too large in circumference. So I put it through the wash again. Oh, dear. It came out like a coconut husk, about an inch thick and just the right size for a person with a coconut-sized head. Back to the beginning.
Fortunately, I had bought more yarn than I needed, so I started from scratch. There wasn't quite enough to make the entire closed football, so I made a nice, overly-long cap. This time, I hand-felted it by soaking it in very hot water on the stove, wringing it roughly while wearing very heavy rubber gloves, and "shocking" it in a bowl of ice water, going through this process several times. Success! It turned out beautifully and will soon be winging its way to Winnipeg. Here is my dad modelling the finished cap. Dad looks pretty hardy for 90 years old, I think.

Sunday, September 28, 2014

HSF Challenge #18 -- Poetry in Motion. An 1830s "housewife".

This challenge is to find a poem and make something inspired by it. Or, make something and find a poem that fits it. Yikes! What poem could ever describe the kind of stuff I like to make? Poems about drab New England farm women in the 1830s? They call that "The Romantic Era", but I don't think those ladies thought of their lives as all that romantic.

However, I came upon a poem called Dorothy: A Country Story, in Elegiac Verse by Arthur Joseph Munby (1882). It's about a young servant girl on an English farm, and although it would be dated later than my time period, some things don't change all that much. I focused on the third chapter, which describes Dorothy's clothes and few possessions. There is so much in there, I could make a long list of projects! One object mentioned is her "housewife", the common name for a small sewing kit made of fabric and rolled up to carry. Also called a "huswif" or "hussif", every woman had some version of one, and soldiers were given one to mend their uniforms. Here is one from the 1830s.
See the handy pockets for holding sewing tools and notions, and the wool flaps for pins and needles. Each pocket and piece of trim is made from a different piece of calico, scraps from clothing made by the seamstress.


Below is the one I made, rolled up and ready to tuck in a drawer or pocket.  Unrolled, it has a backing of a flowered print, bound with green and tan floral bias tape.  The inside is lined with yellow wool cloth, has three pockets, and an extra layer of wool for needles and pins. 

I put a little book with it called The Complete Country Housewife, published in 1770, and no doubt it was the go-to book for many hard-working women for many years. 

I'm sure I'll use my "housewife" often!


Historical Fortnightly Challenge #18 – Poetry in Motion
Date: Sept. 28, 2014
Object: Housewife, a portable sewing kit
The Challenge: Poetry in Motion, to create something inspired by the poem, Dorothy: a Country Story, by Arthur Joseph Munby. (See exerpt below).
Fabric: Printed cotton calico, yellow-dyed wool.
Pattern: Self-drawn from extant item.
Year: 1830
Notions: cotton thread, cotton embroidery thread, cotton twill tape.
How historically accurate is it? Completely. All hand sewn.
Hours to complete: 5
First worn: Immediately used for sewing kit.
Total cost: All scraps from previous sewing. $0.

From “Dorothy: a Country Story.” III. Dorothy’s Room

Arthur Joseph Munby (b. 1828)


’T WAS but a poor little room: a farm-servant’s loft in a garret;

  One small window and door; never a chimney at all;

One little stool by the bed, and a remnant of cast-away carpet;

  But on the floor, by the wall, carefully dusted and bright,

Stood the green-painted box, our Dorothy’s closet and wardrobe,
  Holding her treasures, her all—all that she own’d in the world!

Linen and hosen were there, coarse linen and home-knitted hosen;

  Handkerchiefs bought at the fair, aprons and smocks not a few;

Kirtles for warmth when afield, and frocks for winter and summer,

  Blue-spotted, lilac, gray; cotton and woolen and serge;
All her simple attire, save the clothes she felt most like herself in—

  Rough, coarse workaday clothes, fit for a laborer’s wear.

There was her Sunday array—the boots, and the shawl, and the bonnet,

  Solemnly folded apart, not to be lightly assumed;

There was her jewelry, too: ’t was a brooch (she had worn it this evening)
  Made of cairngorm stone—really too splendid for her!

Which on a Martlemas Day Mr. Robert had bought for a fairing:

  Little she thought, just then, how she would value it now!

As for her sewing gear, her housewife, her big brass thimble,

  Knitting and suchlike work, such as her fingers could do,
That was away downstairs, in a dresser-drawer in the kitchen,

  Ready for use of a night, when she was tidied and clean.


Tuesday, May 6, 2014

HSFC #7 Tops and Toes

I've had these finished stockings lying around for a few weeks now and it's time to get them on the blog! I saw some pictures of painted ladies' stockings from the early 1920s and thought, "I can do that!" I had scads of acrylic craft paint and several pairs of knees-highs. I had to order some fabric paint medium to make the craft paint more flexible, but JoAnn online had a $1 shipping offer, which is much better than driving 50 miles to the nearest fabric or craft store.


Here are some photos of women getting their stockings painted right on their legs! I can only imagine they must have had to wear the stockings until the paint dried, and they didn't use quick-drying acrylics in those days. Of course the paint went right through to their legs. 


These stockings actually came painted.


I followed this tutorial on Burda Style and it worked quite well. I used wine bottles to stretch the stockings during the painting process. Why not give it a try?

Historical Fortnightly Challenge

Date: April 15
Object: Painted 1920s stockings
The Challenge: Tops & Toes
Fabric: Nylon, acrylic paint
Pattern: Daisy stencil pattern, printed from internet
Year: c. 1920-1923
Notions: none
How historically accurate is it? In concept, 100%. Materials, 0%. Stockings would have been silk and thigh-high. Paint would have been oil-based.
Hours to complete: 1
First worn: Only for the photo!

Total cost: 50 cents for stockings (sale), paint and brush on hand, small amount of fabric medium ($1.20 per bottle).


Monday, April 21, 2014

Pretty Pictures

I recently visited distant cousins in the U.K. and was so charmed by some watercolor paintings, I had to photograph them. They were painted by my cousin's grandmother Frances Barclay Womersley, who was my grandmother's sister. No doubt she worked from contemporary fashion prints. Since this era of fashion is one of my favorites, I searched out some similar images. Frances was born in 1884 and married in 1904. She would have been 28-30 years old, a young mother, when she painted these pictures. Her daughter and grand daughter would also become painters.


The shine on the satin and the detail on the lace are so pretty!


A print day dress I'd love to wear!
Here are some prints I found online from the Haas Brothers catalog of 1913. Haas Brothers, like other exclusive stores, offered reproductions of gowns from the leading fashion houses of Europe. Those were the days when you went to the store and sat on a gilded chair, sipping wine or tea, while beautiful models in the latest outfits paraded past you. The ones you chose were made up for you -- no off-the-rack here!   


I was especially struck by the Martial et Armand designs, which seemed so similar to the first painting. This color print from 1911 has that ornate quality. 


Monday, February 24, 2014

Life Cuts Into Sewing Time

I was so pumped up about my pink little girl's dress, but have had to put it  on the back burner for awhile. For one thing, sewing that slippery silk was maddening. I was making all those ruffles by hand and as things went on, I began to look at the whole thing as a hideous mess. That means it's time to step back. 

Also, I leave for a trip to England next week and it's better to be prepared for that and come back to a clean house. My dear Dad, with whom I live, turns 90 in March and he has decided to celebrate with what he says is his last trip to the old country. Dad's family emigrated from England to the US in 1916, halfway through the births of nine children. He was born in the US, being the 8th child, but his family kept strong ties to the family across the Pond. In their retirement, Mom and Dad made frequent trips, making new friends while they visited the old. I'm quite excited about the adventure, as I haven't been in on these visits, and realize I'm probably the one who will keep up the connection to the Barclay tribe on the other side. 

The Historical Sew Fortnightly Challenge has "Under It All" and "Bodice" coming up shortly, and those are things I need greatly. I've got things going in that direction, but am having endless trouble with fitting. I really, really need a dressmaker's form, and the money to buy one. A couple of years ago, I tried the duct tape method and it ended up being one big bag of duct tape. It was firmly stuffed with heavy sweaters, but still sagged and stretched. Out in the trash! I make my own patterns and I'm beginning to wonder if I've lost my knack. It really does sound like it's time to step away from the sewing machine for a bit. 

I've discovered an entertaining sewing blog called The New Vintage Lady. Shelley is a talented artist who resizes patterns from the 1930s and 1940s for the Plus Size Lady. I hate to admit that I have become one of them, but thank goodness for Shelley! I am really tempted by this pattern from her Etsy shop. Very versatile pattern!

Late 1910s blouse in a 46 bust!


Thursday, February 13, 2014

HSFC #3 PINK! Inspiration


Now pink is not a color I wear, unless it's a very coral pink. But, do you know who loves pink? Every little girl on the planet! What little girl doesn't wish she had a silky pink dress with ruffles and bows and some sort of flower thing going on, and while we're at it, matching ruffly bloomers so her panties don't show when she pirouettes? I happened to have a very old piece of silky pink fabric I had no idea what to do with.  With the year 1920 in mind, I found a goldmine of inspiration online.

I colorized this photo of an adorable toddler, but you just know that dress was originally pink. This type of dress was quite popular. The style is very simple: a lined slip-on dress with bound neckline and sleeves, and a very deep hem which can be taken down as Susie grows.  The string tie at the neck tightens or loosens the neckline.


This dress is a bit more detailed than I care to do, but I liked the fabric flower at the shoulder. I want to add that to my little dress.

An interesting bit of history: the idea that pink  is for girls and blue for boys is a 20th century concept. In the 19th century, it was often advised that mothers dress boys in pink, as it was a "strong" color, and girls in a serene blue. In non-western cultures, it is still not widely known or accepted. When I was a teacher at an International School in SE  Asia, I was always amused when families returned from summer holidays with new school clothes for the children. So often, Mummy would choose lovely pink outfits, from running shoes, socks, and upwards, for her little boy.  


Those were the days of talented children in silent films, and one I think was so cute was Baby Peggy Montgomery. I just love her mischievous dark eyes and bobbed hair, and her ruffly dress!


Sunday, February 2, 2014

#2 Innovation -- Motoring Coat In Progress


I've bitten off more than I could chew for this fortnight! I spent a lot of time constructing the basic coat and still have to sew in the sleeves and front pocket, and put on the detachable collar. I am happy with the coat, black and severe as it may be. Dad calls it my mourning dress. The collar is a beautiful velvet scarf I've had in a box for ages. Very 1920s - devoré velvet in a lovely paisley-ish pattern of black, rose, green, gold, and purple, with a slinky black fringe on the ends. Devoré was a process invented in the 1920s, where chemicals were applied to eat away (devour) the velvet pile in patterns. The gathered scarf adds a bit of glamor and warmth to the very basic coat. It's Double Innovation -- clothes for driving in cars and a new process for fabric!


Velvet shawl collar
Front of coat

Back, showing  buttoned
vent pleat


The Challenge: Innovation - The automobile and clothes to wear while in it, the devoré velvet process.

Fabric: 100% linen fabric for the coat, velvet collar
Pattern: self-drafted from photographs of coat patterns.
Year: early 1920s
Notions: Thread, 15 abalone shell buttons, bias tape for attaching collar, snaps
How historically accurate is it? Pretty accurate.
Hours to complete: Too many
First worn: Not quite finished.
Total cost: About US$10 from thrift store and notions on hand.

So I'm putting this in the closet for a bit, because I want to dive into the "Pink" category -- Challenge #3 Pink.

Monday, January 20, 2014

Late 1910s Pattern Drafting

I am following a book published in 1917, Clothing For Women: Selection, Design, Construction, by Laura I. Baldt, which is available online for free. I took a course many years ago in pattern drafting and tailoring, but as historical sewers know, methods change and so do the basic structures of tailoring. The silhouette of the late 1910s is different from that of other periods. Gone is the S-bend, but the slim, boyish figure of the 1920s is not yet in vogue. If I want to get the correct look, I have to cut to the figure of the times.

Here is the measuring guide for this book, which I've made into a page where I can record measurements, and then follow the book's directions for making up a basic pattern or sloper.


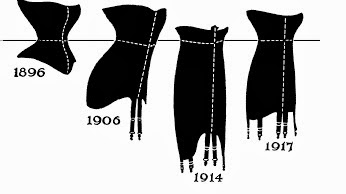
Notice the droop of the bustline and the corresponding narrowness at the back. A lot of this is created by the underwear, which is so important to wear when measuring and fitting. Women wore a camisole or camisette (one-piece camisole and drawers) with a corset on top which reached from the thigh to just under the bust. Essentially, the bust was not supported or pulled up as much as we are used to today. If you are really gung-ho about this, there is an excellent free pattern and tutorial from Festive Attyre for a c. 1916 corset. Jen's pattern and directions are clear and as easy as you'll get when making up such a complicated garment.

I'm an older (choke, clear throat) woman, and a good corset would be necessary for me to get this shape. I'm going to work on that for the Historical Sew Fortnightly Challenge on Shape and Support, although I need it now! When I was a child in the 60s, I spent a couple of weeks every summer, staying with my grandmother. A few times, I caught a glimpse of her strapping on her girdle, as she called it. I have researched shapes of corsets, and I swear, that woman still wore the late teens model. She wasn't a heavy person, but I suppose once you are used to wearing a thing like that, you feel all out there without it. There's Grandma - 1917. She'd have been 24 years old when she bought that corset. And it must have cost a pretty penny.


Thursday, January 16, 2014

HSFC #2: Innovation -- A Ladies' Motoring Coat

When it comes to fashion periods, I really gravitate toward c. 1915-1924. Post-Edwardian/Titanic era and very much pre-Flapper. I like the shorter hemline, wider skirts, pretty blouses, off-the-waist waistlines, and the layers of collars and everything. Mainly, it's something I'd actually wear in real life. Patterns became simpler and less tailored, so sewing is simpler. 


When it comes to choosing an innovation that affected fashion during this time, we have a long list to choose from. New inventions, new fabrics, new media -- how do I choose? I finally settled on the automobile as the innovation, and decided to make a motoring coat or automobile duster. In the early 1900s, owning an automobile was a huge mark of status. Unfortunately for drivers and passengers, autos were open, roofless, windowless vehicles, so a drive could leave one pretty grimy from flying dust. To protect their clothes, they would wear a long, loose coat appropriately called a "duster". Eyes were protected with goggles, and a good snug hat covered the head. Women tied down their hats with veils that could be pulled over the face. Just arriving in a motoring coat told everyone "I own a car!!!" Of course, as the years rolled on and Henry Ford produced a car almost everyone could afford, motoring coats lost their glamour. But not their usefulness. Even with enclosed cars, a good duster came in handy for keeping the clothes tidy.

I'm going with a combination of these styles:
Linen motoring coat, c.1910-15.
I want a straight single-breasted style with a loose fit, with a contrast color on the collar and cuffs.


Linen motoring coat by Worth, pre-1910
I like this higher collar, but the loose fit of the one above. I've thought about making the back with a pleat at the top and made in two separate panels connected with a line of buttons. Lots of buttons! I have a good supply of abalone buttons that would be just right.


Now take note that dusters are usually dust-colored. I am strictly limited to the fabric I have on hand, being pretty well broke when it comes to stuff besides food and gas for my car (yes, folks, I own an automobile!). I have a great stockpile of fabric from years of stashing, and several good-sized pieces of linen. Linen's the fabric for a duster, but I need a lot of it for a long-sleeved, ankle-length garment. Therefore, my duster is going to be black. I know -- every speck of dust from here to Timbuktu will show up on my black duster. But it will be cool, perhaps even steampunk (Challenge #20 - Alternate Universe).  I just googled steampunk long coat and whuddayaknow?! - they're all black!

Tuesday, January 14, 2014

Challenge #1: Make Do and Mend - Old-Fashioned Nightgown

Before...
Such a simple project, but it's taken me a long time. The hand-sewing is slow with my finger problem (lack of finger) but I'm happy with the embroidery. The flannel-lined yoke is a nice, cozy touch, good for those cold winter nights. I've had this hanging in the dining room and my 90-year-old dad, with whom I live, calls it my Mother Hubbard. For those who don't know, that's the old-time name for a loose long gown of nightgown construction, worn as a nightgown or by pregnant women in the past. I tell him it's a fancy nightie for a farm lady, a garment that would make the old farmer think, "Hubba, hubba! The wife's wearing the embroidered nightgown tonight!". With the cap, it'll be a hot time on the old farm tonight!

I read long ago that the traditional Hawaiian muu-muu gown is based on the nightgowns the early missionary women wore. Before that, Hawaiian women wore much less, and since they were large Polynesian people, the nightgown pattern was just the thing to cover up a sizeable woman.


Bird's Eye embroidery

Flannel hand-stitched into yoke

Completed yoke

The Challenge: Nightgown and Nightcap for late 19th c. woman
I took a ready-made nightgown of traditional design and fabric and altered it to be more typical of the period. I lined the yoke with unbleached cotton flannel and hand-stitched it to cover all seams in the yoke.  I embroidered in matching thread along the outer edge of the front yoke. 
I made a nightcap in similar fabric with a front trim of ruffled eyelet.
Fabric: Unbleached muslin.
Pattern: Nightgown bought ready-made from Vermont Country Store, a business that specializes in old-time products. Embroidery pattern from Peterson's Magazine, 1859.
Nightcap: Pattern from Peterson's Magazine, 1859. Made of unbleached cotton muslin  fabric. Machine and hand-sewn.
Year: 1860s - 20th century
Notions: four buttons, beige embroidery thread, cotton eyelet ruffled lace, beige sewing thread.
How historically accurate is it? The nightgown design and fabric are typical of a working class/farm woman's wardrobe. The new buttons are accurate in appearance. The hand embroidery is authentic.
The machine overcast stitching on the seams is not accurate.
Hours to complete: 5 hours, mainly because of hand-sewing.
First worn: By me? It no longer fits, so it goes in the costume trunk.
Total cost: $2 for nightgown at thrift store (new return item from VCS), $.45 for embroidery thread, all other items on hand.  Total: $2.24.